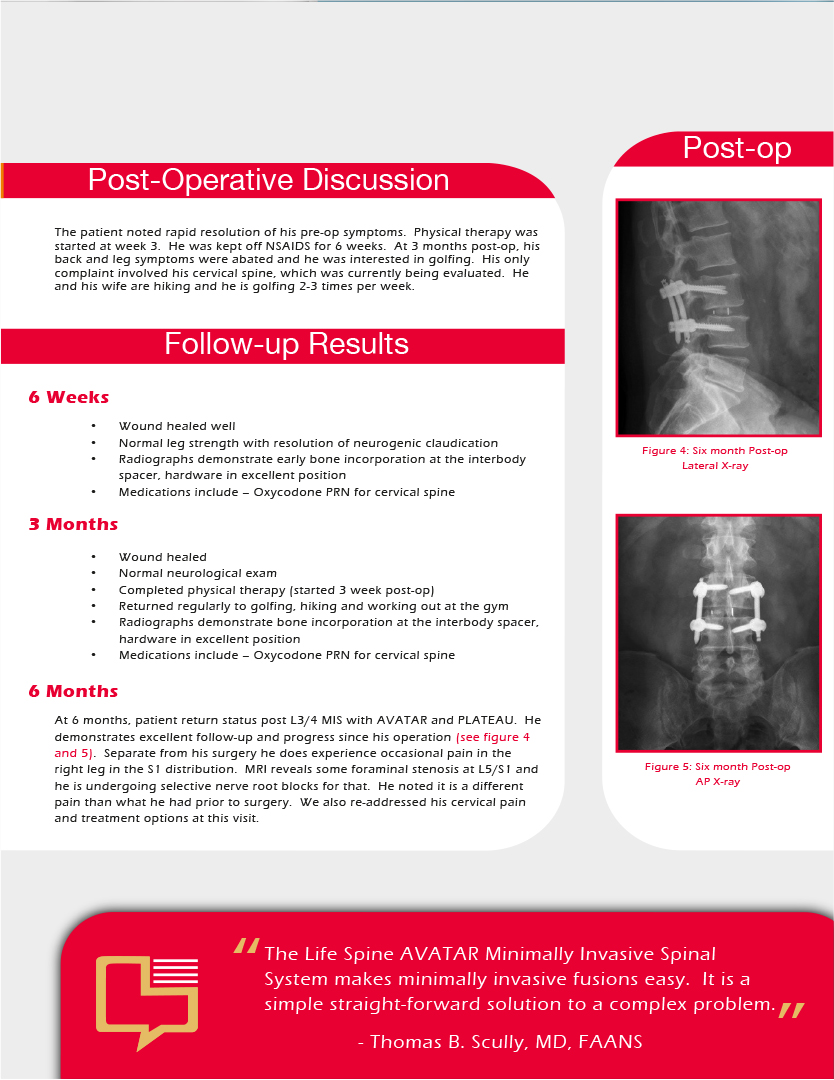
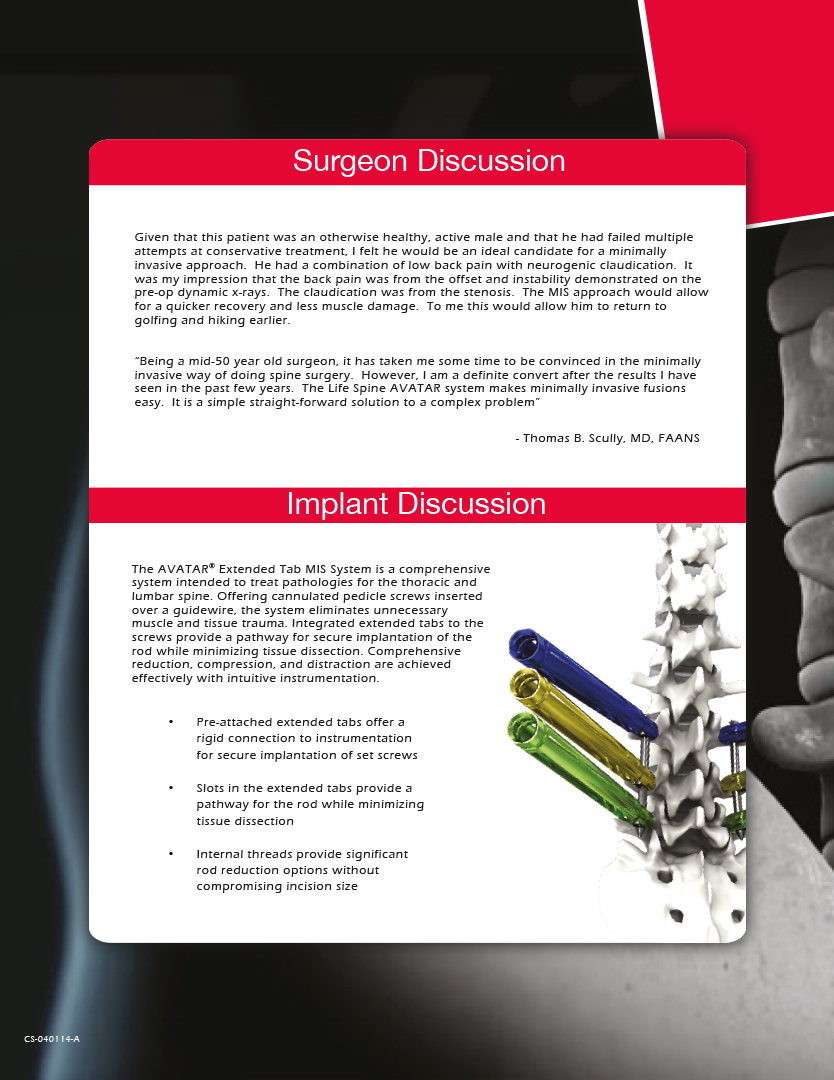
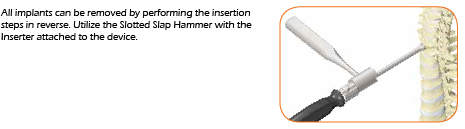
BOTONES DIPRO cadera
botones neuronuevo1
botones maxilo2

direccionBogota - Carrera 15 # 74 - 45 Oficina 504 El Lago - Edificio Venus

TELEFONO2

 317 668 0463 - 01 8000 950555 

corre

 Esta dirección de correo electrónico está protegida contra spambots. Usted necesita tener Javascript activado para poder verla.


direccionCúcuta- Avenida 11E N° 5AN -86  Barrio Santa Lucia

TELEFONO2

5745075 - 316 344 9293

corre

Esta dirección de correo electrónico está protegida contra spambots. Usted necesita tener Javascript activado para poder verla.  


direccion

Bucaramanga - Calle 35 N° 28-20 Edificio Parma Oficina 201 Aurora

TELEFONO2 5745075 - 318 310 0960

corre

Esta dirección de correo electrónico está protegida contra spambots. Usted necesita tener Javascript activado para poder verla.


direccion

Cartagena - Urbanización Santa Lucia Manzana J Casa 12,

TELEFONO2

318 334 9173

corre

Esta dirección de correo electrónico está protegida contra spambots. Usted necesita tener Javascript activado para poder verla.


INTRODUCTION
The AVATAR MIS System offers cannulated pedicle screws inserted over a guidewire to reduce muscle and tissue trauma. Extended tabs integrated to the screws provide a pathway for secure implantation of the rod while minimizing tissue dissection. Reduction, compression, and distraction are achieved simply and effectively with intuitive instrumentation.

FEATURES AND BENEFITS
The AVATAR MIS System offers the following features and benefits.
• Extended tabs provide rigid connection to instrumentation for secure implantation of the screws
• Slots in the extended tabs provide pathway for the rod while minimizing tissue dissection
• Easy to use reducer allows for up to 20mm of rod reduction

1. Preoperative Planning and Patient Positioning

Preoperative planning is critical in the preparation for spinal surgery. A complete radiographic evaluation (A/P and lateral films) of the patient should be completed for proper diagnosis prior to surgery.
Carefully place the patient in the prone position in normal lordosis following induction of anesthesia.

2. Access Needle and K-wire Insertion

Create an incision slightly larger than the outer diameter of the radiolucent sleeve, approximately 18mm.
Using fluroscopy, insert the Access Needle Stylet and Access Needle Sheath into the pedicle. Remove the stylet and insert the K-wire through the Access Needle Sheath. Confirm the position of the K-wire with A/P and lateral views. Once the K-wire position is determined, remove only the Access Needle Sheath.

3.AWL

Insert Dilator #3 over the K-wire To penetrate the cortex, insert the Bone Awl over the K-wire and through Dilator #3. Remove the Bone Awl. 

4.TAP

Insert Dilator #4 over Dilator #3. Remove Dilator #3. A radiolucent Dilator #4 is available for increased visualization under fluoroscopy.

Securely attach the Ratcheting Handle to the cannulated Tap. Pass the Tap over the K-wire. Utilizing fluoroscopy to ensure that the K-wire does not advance, tap to the desired depth. Confirm depth measurement on the Tap against the top of Dilator #4 and select the appropriate screw length.

5. Screw Placement

Once tapping is complete, remove Tap and insert Dilator #5 over Dilator #4. Remove Dilator #4. A radiolucent Dilator#5 is available for increased visualization under fluoroscopy and nerve monitoring.

Polyaxial Screw Attachment
Securely attach the Ratcheting Handle to the Screw Driver. Insert the tabs of the polyaxial screw into the sleeve of the Screw Driver.
Securely align the Screw Driver tip with the saddle and hex of the polyaxial screw. Rotate the proximal knob on the Screw Driver clockwise to secure the polyaxial screw to the Screw Driver.
Utilizing fluoroscopy, insert the polyaxial screw over the K-wire to the appropriate depth. Turn the proximal knob on the Screw Driver counter clockwise and remove the Screw Driver from the polyaxial screw.
Place remaining screws using the same technique.

6. Rod Measurement

Create an incision between the polyaxial screws to allow for rod insertion. Place the Rod Calipers into the tabs of the screws. Seat the Calipers fully into the screw head and measure the required rod length on the Calipers.
All rod measurements on the Calipers include a total of 12mm rod overhang.

7. Rod Insertion

Turn the knob on the Rod Inserter counter clockwise and once loose, push the knob to open the distal end of the Rod Inserter. Attach the selected rod to the Rod Inserter and push the bayonet forward to grab the rod. While holding the bayonet against the rod, turn the knob clockwise to secure the rod.

Insert the rod into the polyaxial screw. If required, use the Rod Pusher to advance the rod. Confirm rod position fluoroscopically.


8. Breakaway Insertion

Securely attach the Breakaway into the Switching Stick. While holding the rod in position with the Rod Inserter, insert the Switching Stick through the extended tabs and rotate clockwise to seat the Breakaway and secure the rod in place. Confirm rod position fluoroscopically with A/P and lateral views. Place remaining breakaways using the same technique.

9. Reduction


Confirm the amount of reduction on the Reducer. Once reduction is achieved (Reducer must read zero), remove the Switching Stick. Attach the breakaway securely into the Switching Stick and insert through the Reducer and Counter Torque Wrench. Rotate the Switching Stick clockwise to secure the breakaway and rod.

10. Compression/Distraction

While pressing the button on the Torque Handle, securely attach it to the Counter Torque Wrench. Slide the Counter Torque Wrench over the extended tabs and the polyaxial screws. Insert the Breakaway T-Handle through the extended tabs and over the breakaway. Apply a primary clockwise torque of 110 in-lbs to secure the head angulation. An audible and tactile confirmation indicates that the required torque has been applied.

After the primary break, compression and distraction may be performed.

Attach the Compressor or Distractor to the Counter Torque Wrench and orient the system.

Appy desired compression or distraction.

11. Final Tightening

Slide the Counter Torque Wrench over the extended tabs and the Polyaxial Screws. Insert the Breakaway T-Handle through the extended tabs and over the breakaway. Apply the secondary clockwise torque of 40 in-lbs to lock the
rod and secure the construct.
To eject the breakaway remnant, slightly retract the ejector pin and reinsert into the Breakaway T-handle. The light impaction created during the reinsertion will disengage the remnant from the Breakaway T-handle. Discard all
remnants. Perform final tightening on all breakaways using the same technique.


12. Tab Removal

With the Counter Torque Wrench seated over the screws, insert the Extended Tab Remover into the screws. Insert the extensions on the Remover fully into the slot of the screws. Once inserted completely (confirmed by tactile feedback), turn the Remover clockwise until it engages the horizontal slots of the screw. This is confirmed with tactile feedback. Continue turning the Remover clockwise and applying torque until both tabs have separated from the screw.


13. Removal

Insert the Counter Torque Wrench and Collar Remover over the screws. Turn the Collar Remover counter clockwise to remove the breakaway. Repeat for all screws and remove the rod. Securely insert the screw driver to the screw and turn counter clockwise to remove the screw.

14. Closure


Wound closure is performed in the customary manner.

GETTING BACK IN SWING

Solving Stenosis the Minimally Invasive Way

1

2

3


APOYO ANTERIOR A TRAVÉS DEL ENFOQUE LATERAL

El Sistema de Espaciadores Laterales PLATEAU-X permite a los cirujanos proporcionar efectivamente soporte de columna anterior mediante un acercamiento lateral. El sistema PLATEAU-X incorpora un amplio conjunto de instrumentos e implantes para agilizar el procedimiento quirúrgico.

Principales características y beneficios:

  • Borde delantero auto-distrayente para facilitar la inserción del implante
  • El diseño convexo maximiza el contacto de la placa final de la vértebra para el paciente ideal
  • Ventanas de injerto grandes y abiertas para un máximo de contención de injerto óseo
  • Marcadores radiopacos de tantalio para mejorar la visualización intraoperatoria


PLATEAU®-X Espaciador, 0 °

7°PLATEAU®-X Espaciador, 7 °

Informacion del Producto

Características principales

  • Configuraciones paralelas y lordóticas
  • Grandes ventanas de injerto abiertas para máxima visibilidad y contención de injertos óseos
  • Marcadores radiopacos de barra de tantalio mejoran la visualización intraoperatoria
  • Patrón agresivo de los dientes evita la migración del injerto
  • Implantes fabricados con Invibio® PEEK-OPTIMA®

Tecnica Quirurgica


INTRODUCCIÓN

Los espaciadores cervicales Plateau®-C están diseñados con grandes áreas de injerto abiertas para una capacidad máxima de injerto óseo. Los espaciadores PLATEAU®-C están disponibles en versiones paralelas, lordóticas y Bi-Convex para acomodar una variedad de anatomías del paciente. Implantes fabricados con Invibio® PEEK-OPTIMA®

Características y Beneficios

El Sistema de Espaciador Cervical PLATEAU-C ofrece las siguientes características y beneficios:


Importante: Todos los implantes e instrumentos referenciados están diseñados y probados para su uso solamente con el Sistema de Espaciador Cervical Plateau-C. Esta guía de técnica quirúrgica establece procedimientos detallados y recomendados para el uso de los implantes e instrumentos Plateau-C. Ofrece orientación que usted debe prestar atención, pero, como con cualquier guía técnica, cada cirujano debe considerar las necesidades particulares de cada paciente y hacer los ajustes apropiados cuando sea necesario.

Nota: Este manual está diseñado como una guía solamente. Existen múltiples técnicas para la implantación de sistemas de fijación espinal y, como con cualquier procedimiento quirúrgico, el cirujano debe estar entrenado y familiarizado con los componentes del sistema de implante antes de proceder.

PLATEAU®-C Spacer System, Paralelo 0 ° Implantes


PLATEAU®-C Spacer System, Paralelo 0 ° Implantes


PLATEAU®-C Spacer System, Implantes Bi-Convexos


CONJUNTO DE INSTRUMENTOS ESTÁNDAR - PLATEAU-C

Varios instrumentos están disponibles para su uso con el Sistema Espaciador Cervical Plateau-C para facilitar la implantación.

INSTRUMENTOS DE PEDIDOS ESPECIALES - PLATEAU-C

1. Planificación Preoperatoria y Posicionamiento del Paciente

2. Exposición

Se puede realizar una incisión transversal de la piel sobre el nivel intervertebral apropiado.

3. Discectomía

4. Preparación de la placa final

5. Selección del tamaño del implante

6. Material del injerto

7. Insertar el implante


8. Verificar la Posición del Implante


9. Eliminación


SOLUCIONES ANATÓMICAS IDEALES

Los espaciadores cervicales PLATEAU-C están diseñados con grandes áreas de injerto abiertas para una capacidad máxima de injerto óseo. Los espaciadores están disponibles en versiones paralelas, lordóticas y bi-convexas para acomodar diferentes anatomías del paciente.

Principales características y beneficios:

  • Parámetros paralelos, lordóticos y bi-convexos
  • Ventanas de injerto grandes y abiertas para un máximo de contención de injerto óseo
  • Patrón agresivo de los dientes evita la migración del injerto
  • Marcadores radiopacos de barra de tantalio mejoran la visualización intraoperatoria


Paralela

Bi-Convex

Angular